To make cement blocks, mix cement, sand, and water in the correct proportions. Pour the mixture into molds and let it cure.
Cement blocks are essential in construction due to their durability and strength. Making them yourself can be cost-effective and rewarding. Start by gathering the necessary materials: cement, sand, and water. Use a concrete mixer to blend these components thoroughly. Once mixed, pour the blend into block molds and let them cure for 24 to 48 hours.
Ensure the blocks are kept moist during the curing process for optimal strength. This method allows you to create sturdy building blocks suitable for various construction projects. Making cement blocks at home or on-site can significantly reduce construction costs and improve project efficiency.

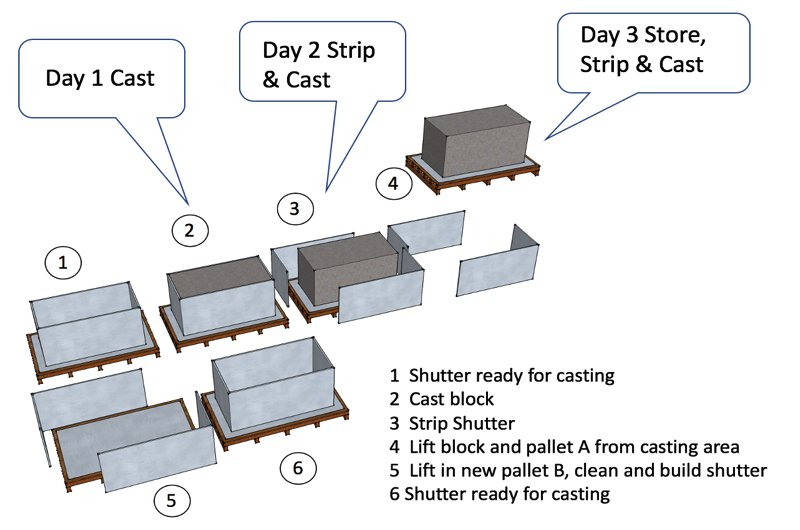
Credit: fibointercon.com
Introduction To Cement Blocks
Cement blocks are essential materials in construction. They are made from a mixture of cement, water, and aggregates. These blocks are strong, durable, and versatile. They are used in building walls, foundations, and other structures.
Making your own cement blocks can be a rewarding project. It allows you to customize the size and shape. You can also save money by making them at home.
The Role Of Cement Blocks In Construction
Cement blocks play a crucial role in modern construction. They provide structural stability and strength. Builders use them in both residential and commercial projects. These blocks are resistant to weather and pests. They also offer excellent fire resistance.
Cement blocks come in various sizes and shapes. This allows for flexibility in design. Builders can create different structures with ease.
Advantages Of Diy Cement Blocks
Making cement blocks at home has many benefits. Here are some key advantages:
- Cost-Effective: Making your own blocks can save you money.
- Customization: You can create blocks of different sizes and shapes.
- Quality Control: Ensure the quality of materials used.
- Eco-Friendly: Use recycled materials to make your blocks.
DIY cement blocks can be a fun and educational project. It is also a great way to involve the whole family.
Materials Required
Making cement blocks is a straightforward process, but you need the right materials. This guide will walk you through the essential materials required for making durable cement blocks. Having the correct materials will ensure your cement blocks are strong and long-lasting.
Cement
Cement is the key ingredient in making cement blocks. It acts as the binding agent that holds the mix together. Use high-quality Portland cement for the best results. Avoid using expired or old cement, as it may have lost its binding properties.
Sand
Sand is another critical material. It gives the cement block its texture and structure. Use clean, fine sand without impurities. Avoid using beach sand, as it contains salt, which weakens the blocks over time. River sand or manufactured sand is ideal for this purpose.
Aggregate
Aggregate adds strength and bulk to the cement mix. Use crushed stones or gravel as aggregate. The size of the aggregate should be consistent, ideally between 1/4 to 3/8 inches. Make sure the aggregate is clean and free from dust or clay.
Tools And Equipment Checklist
Having the right tools and equipment is essential for making cement blocks efficiently. Below is a checklist of necessary items:
- Mixing Trough: For mixing the cement, sand, and aggregate.
- Shovel: To mix and transfer materials.
- Block Mold: To shape the cement blocks.
- Measuring Bucket: For accurate measurement of materials.
- Water Container: To add the right amount of water to the mix.
- Gloves: To protect your hands while working.
- Safety Goggles: To protect your eyes from dust and debris.
| Item | Purpose |
|---|---|
| Mixing Trough | Mixing the cement, sand, and aggregate |
| Shovel | Mix and transfer materials |
| Block Mold | Shape the cement blocks |
| Measuring Bucket | Accurate measurement of materials |
| Water Container | Add water to the mix |
| Gloves | Protect hands |
| Safety Goggles | Protect eyes |
Safety Precautions
Making cement blocks can be rewarding. But safety is crucial. Proper precautions keep you safe. Below are essential safety steps to follow.
Personal Protective Equipment
Always wear the right gear. This includes:
- Helmet: Protects your head from falling objects.
- Safety Goggles: Keeps your eyes safe from dust and debris.
- Gloves: Protects your hands from harmful substances.
- Boots: Sturdy footwear with a good grip prevents slips.
- Mask: Prevents inhalation of harmful dust particles.
Wearing these items reduces injury risk.
Safe Handling Of Materials
Handle materials safely to avoid accidents. Follow these steps:
- Store materials properly: Keep them in a dry, secure place.
- Lifting techniques: Bend your knees, not your back.
- Use tools: Use wheelbarrows or carts for heavy loads.
- Avoid spills: Clean any spills immediately.
- Label containers: Clearly mark all chemical containers.
These steps ensure safe material handling.
Table Of Common Safety Gear And Their Uses
| Safety Gear | Use |
|---|---|
| Helmet | Protects head from falling objects |
| Safety Goggles | Protects eyes from dust and debris |
| Gloves | Protects hands from harmful substances |
| Boots | Prevents slips with good grip |
| Mask | Prevents inhalation of harmful dust |
Use this table as a quick reference for safety gear.
Creating The Mold
Creating a mold for cement blocks is a crucial step. A good mold ensures your blocks have the right shape and size. This section will guide you through the designing and assembling of the mold.
Designing The Block Mold
Designing the block mold involves deciding the dimensions of your cement blocks. Standard blocks are usually 16 inches long, 8 inches high, and 8 inches deep. You can adjust these measurements to fit your needs.
- Choose a durable material like wood or metal for the mold.
- Ensure the inner surfaces are smooth for easy block release.
- Include a removable bottom to easily extract the block.
Assembly Of The Mold Frame
Assembling the mold frame requires precision. Follow these steps to ensure a sturdy and reliable mold:
- Cut the chosen material into the required dimensions.
- Assemble the sides using screws or nails for wood, or welding for metal.
- Attach the bottom piece securely, making sure it is removable.
| Material | Tools Needed |
|---|---|
| Wood | Saw, Screws, Screwdriver |
| Metal | Metal Cutter, Welding Machine |
Check the mold for any gaps or uneven surfaces. This ensures your cement blocks come out perfect every time.
Mixing The Concrete
Mixing the concrete properly is essential for making strong and durable cement blocks. It involves combining the right amounts of cement, sand, gravel, and water. This ensures the final product has the required strength and longevity. Let’s explore the proper ratios and techniques to achieve the best results.
Proper Ratios For Strength
Using the correct ratios of ingredients is crucial for achieving the desired strength in cement blocks. Here’s a simple guide:
| Ingredient | Ratio |
|---|---|
| Cement | 1 part |
| Sand | 2 parts |
| Gravel | 3 parts |
| Water | 0.5 part |
These ratios ensure the concrete mix is strong and stable. Always measure accurately to maintain consistency in your blocks.
Mixing Techniques For Uniformity
Uniform mixing ensures that all ingredients are evenly distributed. This prevents weak spots in the cement blocks.
Follow these steps for uniform mixing:
- Start by mixing dry ingredients: Combine cement, sand, and gravel in a large container or wheelbarrow.
- Mix thoroughly: Use a shovel or a mixer to blend the dry ingredients until the color is uniform.
- Add water gradually: Pour water slowly into the mix while continuously stirring.
- Check consistency: The mix should be like thick paste, not too watery.
Avoid adding too much water as it can weaken the concrete. If the mix is too dry, add small amounts of water gradually.
By following these guidelines, you can ensure that your cement blocks are strong and durable.
Pouring The Mixture
Pouring the mixture is a crucial step in making cement blocks. This process ensures that the blocks are strong and durable. Proper technique is essential to achieve the desired quality. Below, we break down the steps to ensure you pour the mixture correctly.
Filling The Mold
Filling the mold properly is vital. Start by preparing the mold. Make sure it is clean and free from debris. Pour the cement mixture into the mold slowly. This helps to avoid spilling and ensures an even fill.
Use a trowel to spread the mixture evenly. Make sure the mixture reaches all corners of the mold. This helps to avoid weak spots in the final block. Fill the mold up to the top. Level the surface with the trowel for a smooth finish.
Eliminating Air Pockets
Eliminating air pockets is essential for strong cement blocks. Air pockets can weaken the structure. Tap the sides of the mold gently to release trapped air. You can use a hammer or a mallet for this purpose.
Another method is to shake the mold slightly. This helps the mixture settle and eliminates air bubbles. Use a rod or stick to poke the mixture. This helps to break up any remaining air pockets.
Make sure to check the mixture thoroughly. Ensure no air pockets remain. This ensures the final block is strong and durable.
Curing The Cement Blocks
Curing cement blocks is a crucial step in the block-making process. Proper curing ensures the blocks gain strength and durability. This guide will help you understand the ideal conditions and time frame for curing cement blocks.
Ideal Conditions For Curing
Curing cement blocks requires specific conditions for the best results. Follow these guidelines to create an optimal curing environment:
- Moisture: Keep the blocks moist to prevent cracks.
- Temperature: Maintain a temperature of 50-85°F (10-30°C).
- Shading: Protect blocks from direct sunlight.
- Ventilation: Ensure adequate air flow to avoid mildew.
Time Frame For Curing Process
The curing process takes time. Here is the recommended time frame:
| Days | Action |
|---|---|
| 1-3 days | Keep the blocks covered and moist. |
| 4-7 days | Continue watering, especially in dry conditions. |
| 8-28 days | Water less frequently but keep blocks moist. |
By following these steps, your cement blocks will be strong and durable. Happy block making!
Demolding And Storage
Creating cement blocks at home is a rewarding project. But knowing how to demold and store them properly ensures they last. This guide will help you through the process of demolding and storing your DIY cement blocks.
How To Remove The Blocks
Demolding cement blocks can be tricky. Follow these steps for a smooth removal:
- Check the Set Time: Ensure the cement has set for at least 24-48 hours.
- Wear Protective Gear: Always wear gloves and safety glasses.
- Loosen the Mold: Gently tap the sides of the mold with a rubber mallet.
- Lift the Mold: Carefully lift the mold away from the block.
- Inspect the Block: Check for any cracks or imperfections.
Storing Your Diy Cement Blocks
Proper storage is key to maintaining the quality of your cement blocks. Follow these tips:
- Keep Them Dry: Store blocks in a dry, covered area.
- Use Pallets: Place blocks on wooden pallets to avoid ground moisture.
- Stack Carefully: Stack blocks evenly to prevent tipping.
- Allow Airflow: Ensure there is space for air to circulate between blocks.
Here’s a quick table for easy reference:
| Step | Action |
|---|---|
| 1 | Check the set time (24-48 hours) |
| 2 | Wear protective gear |
| 3 | Loosen the mold |
| 4 | Lift the mold |
| 5 | Inspect the block |
Following these steps ensures your cement blocks are strong and durable. Happy building!
Quality Testing
Quality testing is crucial in making cement blocks. Testing ensures the blocks are strong and durable. This section will guide you on how to test the quality of your cement blocks.
Strength And Durability Tests
Strength and durability tests are essential. They help confirm if the cement blocks can withstand pressure and usage.
- Compression Test: This test measures the block’s ability to bear weight. Place the block in a compression testing machine. Apply pressure until the block breaks. The breaking point shows the block’s strength.
- Water Absorption Test: Soak the block in water for 24 hours. Weigh the block before and after soaking. The difference in weight shows how much water the block absorbed. Low absorption indicates better quality.
- Efflorescence Test: Efflorescence appears as white patches on the block. Spray water on the block and let it dry. Check for white patches. Less efflorescence means better quality.
Common Issues And Troubleshooting
Some common issues can affect the quality of cement blocks. Recognizing and fixing these issues is important.
| Issue | Cause | Solution |
|---|---|---|
| Cracks | Improper curing | Ensure proper curing time and moisture |
| Weak Blocks | Low cement ratio | Increase cement in the mix |
| Efflorescence | Excess salts | Use clean materials and water |
Monitoring and addressing these issues ensures the blocks’ quality. Always perform these tests to maintain high standards.

Credit: m.youtube.com
Practical Applications
Cement blocks have many uses. They are versatile and durable. These blocks are useful for building projects and creative designs. Let’s explore their practical applications in detail.
Creative Uses For Custom Blocks
Custom cement blocks can be used creatively. Here are some ideas:
- Garden Pathways: Design unique paths in your garden.
- Planters: Create strong and stylish planters.
- Furniture: Build custom tables or benches.
- Decorative Walls: Add character to your outdoor space.
These ideas can make your space unique. Custom blocks add a personal touch to any project.
Incorporating Blocks Into Building Projects
Cement blocks are essential in building projects. They provide strength and stability. Here are some common uses:
| Building Project | Application |
|---|---|
| Walls | Use blocks to build strong walls. |
| Foundations | Blocks provide a sturdy base for structures. |
| Fences | Use blocks to create durable fences. |
| Pillars | Build pillars for extra support. |
Incorporating cement blocks into your projects enhances durability. They ensure long-lasting structures.

Credit: www.globmac.com
Is the Process of Making Cement Blocks Similar to the Industrial Production of Cement?
The process of making cement blocks is different from the industrial production of cement. While cement is made by grinding and heating a mixture of limestone and clay, cement blocks are made by mixing cement with sand, gravel, and water, then molding and curing them to form solid blocks. This is how cement is made.
Frequently Asked Questions
Is It Cheaper To Make Your Own Concrete Blocks?
Making your own concrete blocks is usually cheaper. You save on labor and transportation costs. Bulk materials often cost less.
What Are The Ingredients For Making Cement Blocks?
Cement blocks require Portland cement, sand, gravel, and water. Mix these ingredients to form a dense paste. Mold and cure the blocks for strength.
What Is The Mixture For Concrete Blocks?
The mixture for concrete blocks typically includes cement, sand, gravel, and water. Use a 1:2:4 ratio: one part cement, two parts sand, and four parts gravel. Ensure the mixture is well-combined and consistency is maintained for strong, durable blocks.
How Are Cement Blocks Made?
Cement blocks are made by mixing cement, sand, and water. The mixture is poured into molds and compressed. After drying, the blocks are cured to gain strength.
Conclusion
Creating cement blocks at home is straightforward and cost-effective. Follow the steps outlined for best results. This DIY project not only saves money but also offers a sense of accomplishment. Start your cement block-making journey today and enhance your construction skills.
Enjoy the process and the durable blocks you’ll produce.


